Installation
Configuration Options
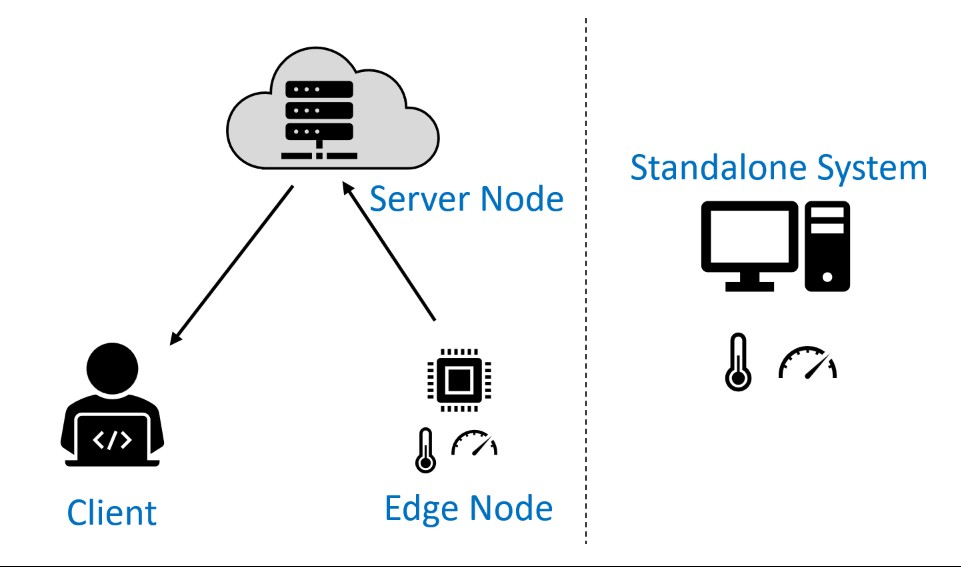
This guide provides instructions for installing one or more components of the Wattsworth stack. The choice of components and their configuration depends on your use case:
Note
These configurations have been tested on Ubuntu 24.04. Other Linux distributions should be compatible but may require minor changes to the following instructions.
- Standalone System: A complete self hosted Wattsworth setup. Capture data from sensors and visualize on a locally hosted instance of Lumen. Ideal for evaluating Wattsworth or remote sites without network connectivity.
- Edge Node: A dedicated data capture system running Joule. Typically a single board computer like the Raspberry Pi. Data can be stored locally or replicated to a server node.
- Server Node: A central repository for archived data from edge nodes and a shared Lumen instance for remote users (clients). Can be hosted on a cloud service like AWS or run on local hardware with appropriate connectivity.
- Client: An end user laptop or workstation. Uses a local copy of Joule to interact with data on remote nodes and a web browser to access the associated Lumen server(s).
The table below lists the components required for each type of installation:
| Pre-Reqs | Joule | Lumen | Nginx | |
|---|---|---|---|---|
| Standalone | system | container | Joule+Lumen | |
| Server Node | container | container | Joule+Lumen | |
| Edge Node | system | Joule | ||
| Client | virtual-env |
Prerequisites
Docker
Install docker using the instructions for your OS available on https://docs.docker.com/engine/install/. The script below should work on most OS distributions but is not generally recommend for production systems.
TimescaleDB
Joule stores data in a TimescaleDB database. Create the files below and then run the following commands to install TimescaleDB
in a docker container. The first file is a docker-compose file that will create a docker container running TimescaleDB. The second file is a systemd service file that
automatically starts the container when the system boots. If you already have a TimescaleDB instance you can skip this step.
If you plan to use this system in production consider changing the POSTGRES_PASSWORD environment variable to a more secure value.
version: "3.9"
services:
  postgres:
    image: timescale/timescaledb:2.11.2-pg15
    restart: always
    environment:
      POSTGRES_USER: joule
      POSTGRES_PASSWORD: joule
      POSTGRES_DB: joule
    volumes:
    - /opt/timescaledb/data:/var/lib/postgresql/data  # persist data
    ports:
    - 127.0.0.1:5432:5432
After creating the files above, run the following commands to start the TimescaleDB container and configure it to start on system boot.
sudo systemctl enable timescaledb.service
sudo systemctl start timescaledb.service

# track container installation progress (Ctrl-C to exit)
sudo journalctl -u timescaledb.service -f
Wait until you see a log message similar to the following before continuing:
postgres-1 | LOG: database system is ready to accept connections
Joule
Joule is divided into a client joule and server jouled. The client can be installed on any
standard OS with Python 3.11 or greater. The jouled server requires a Linux OS and has been tested on Ubuntu and AlmaLinux. Other distributions should work fine but may require some modifications to the configuration. The most recent version is available on pypi.
System Installation
The joule package should be installed with pip if you plan on using the API features or
pipx if you plan on only using the command line interface (CLI). If you want to run the Joule server, first configure a TimescaleDB instance as described in the prerequisites and then use the install.sh script to generate a default configuration in /etc/joule and the associated infrastructure to run it as a systemd service.
Docker Container
The Joule server may also be installed as a docker container. When running inside a container, Joule will not be able to run modules but this can be a useful configuration to work on archived data and is typically used on server nodes. The docker compose file below shows a minimal configuration see [] for full details.
version: "3.9"

  services:
    postgres:
      image: timescale/timescaledb:2.11.2-pg15
      restart: always
      environment:
        POSTGRES_USER: joule
        POSTGRES_PASSWORD: joule
        POSTGRES_DB: joule
      volumes:
        - /opt/timescaledb/data:/var/lib/postgresql/data  # persist data
    joule:
      image: wattsworth/joule:latest
      restart: always
      environment:
        # generate with [openssl rand -hex 16] or similar
        USER_KEY: ebf8d....b43c2
      ports:
        - 127.0.0.1:8181:80
The USER_KEY environment variable is used to
authorize the joule client. To use the container first install joule on the host (either on the system or in a virtual environment) and then run the commands below to start the container and authorize the client.
# copy the docker compose file above to the current directory
sudo docker-compose up -d
joule node add mynode http://localhost:8181/joule ebf8d....b43c2
Lumen
Lumen provides a web frontend to visualize and interact with data collected by Joule nodes. The following instructions configure Lumen in a docker container which is suitable to run on any host OS. The container is configured with environment variables specified in the .env file. Documentation on the particular settings is contained in the sample environment file and can be used as is in most situations although changing the SECRET_KEY_BASE is recommended.
sudo mkdir /opt/lumen && cd /opt/lumen
sudo curl -sL https://raw.githubusercontent.com/wattsworth/lumen-docker/main/docker-compose.yml -o docker-compose.yml
sudo curl -sL https://raw.githubusercontent.com/wattsworth/lumen-docker/main/sample.env -o .env
Create the service file below and then run the following commands to configure Lumen to start on system boot.
[Unit]
Description=Lumen
After=docker.service

[Service]
Type=simple
WorkingDirectory=/opt/lumen
ExecStart=/usr/bin/docker compose up
ExecStop=/usr/bin/docker compose down
Restart=always
RestartSec=10

[Install]
WantedBy=multi-user.target
sudo systemctl enable lumen.service
sudo systemctl start lumen.service

# track container installation progress (Ctrl-C to exit)
sudo journalctl -u lumen.service -f
The initial set up for this container can take several minutes. Wait until you see a log message similar to the following which indicates the web application is running before continuing:
lumen-lumen-1 | [...omitted...]: Passenger core online, PID 54
Nginx
Nginx is a reverse proxy webserver that is used to provide external access to both Lumen and Joule. The following commands
install Nginx, remove the default site and install the configuration files for Lumen and Joule. These files are referenced
in the site configuration file. If only using Lumen, you may omit the Joule configuration file and vice versa. The adduser
command grants Nginx access to the Joule socket file, it is only needed if running Joule.
sudo apt-get install nginx -y
sudo rm /etc/nginx/sites-enabled/default

# common configuration
sudo curl -sL https://raw.githubusercontent.com/wattsworth/lumen-docker/main/host/wattsworth-maps.conf -o /etc/nginx/conf.d/wattsworth-maps.conf

# lumen specific configuration
sudo curl -sL https://raw.githubusercontent.com/wattsworth/lumen-docker/main/host/lumen.conf -o /etc/nginx/lumen.conf

# joule specific configuration
sudo curl -sL https://raw.githubusercontent.com/wattsworth/lumen-docker/main/host/joule.conf -o /etc/nginx/joule.conf

# grant Nginx access to joule, omit if only using lumen
sudo adduser www-data joule
Select one of the configuration files below and modify the server_name to match your domain. No additional configuration
is required to host an HTTP site. To host the site on HTTPS, you will need a valid SSL certificate and
modify the configuration file to include the certificate and key files. If Lumen is configured to host applications on
subdomains (see documentation in /opt/lumen/.env), you will need a CNAME DNS record mapping *.app.<yourdomain> to <yourdomain> and for HTTPS you will need a wildcard certificate for *.app.<yourdomain>.
server{
    listen 80; # redirect http traffic to https
    return 301 https://$host$request_uri;
}

server{
    listen 443 ssl;
    # Change server name to match your domain
    # include *.app if using subdomain apps configuration
    server_name example.wattsworth.net *.app.example.wattsworth.net;

    # Include one or both statements below to enable lumen and/or joule
    include "/etc/nginx/lumen.conf";
    include "/etc/nginx/joule.conf";

    # Security configuration
    # Note: For subdomain apps this must include wildcard *.app.<yourdomain>
    ssl_certificate fullchain.pem;
    ssl_certificate_key privkey.pem;
}
Finally, restart Nginx to reflect the new configuration:
Continue to Quick Start to start using Wattsworth.